
Rancher ES Shift Kit
Bypasses the angle sensor and ECU on the Honda Rancher — your stock thumb buttons take direct control. The 350 kit is available now, 420 coming soon.
Select Your Kit
The 350 and 420 Rancher use different shift mechanisms. Make sure you select the correct kit for your model. Not sure? Contact us and we'll confirm before you order.
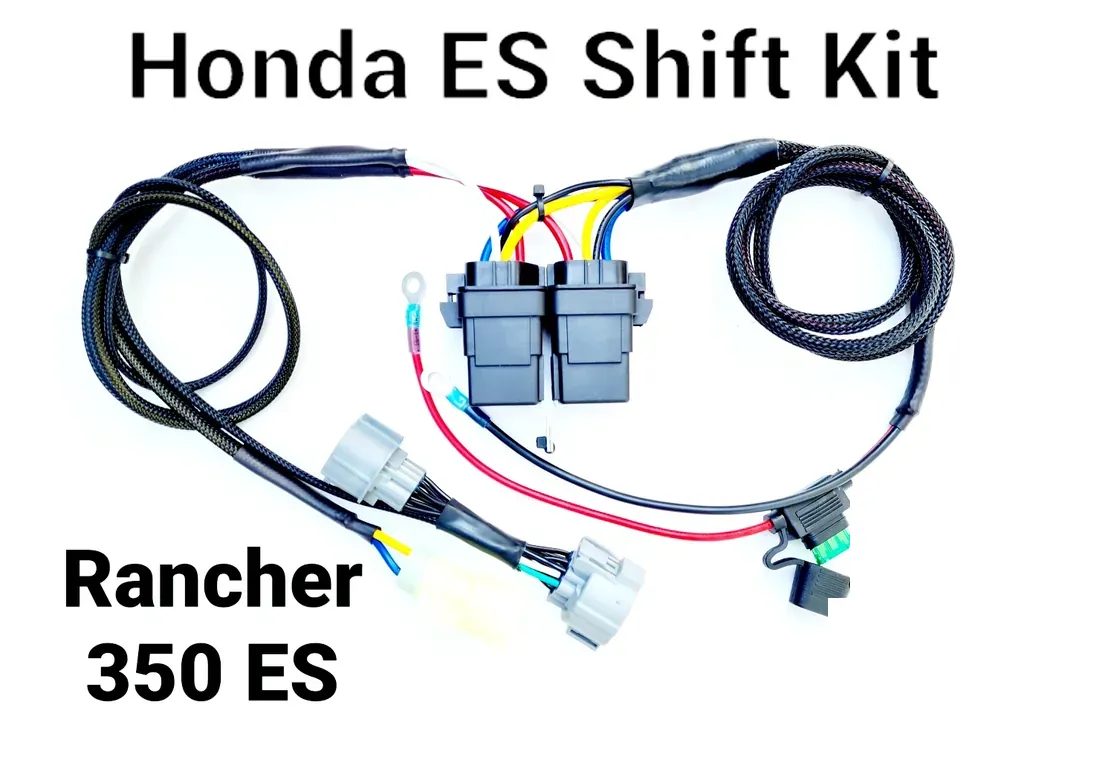
Built for the TRX350 Rancher platform. Covers all 350 model years with a precision-fit actuator matched to the 350's shift mechanism and factory wiring layout.
- Fits 2000–2006 Rancher 350
- TRX350FE and TRX350TE trims
- Plug-and-play wiring harness
- Installs in under 30 minutes
- Free shipping on US orders
The Rancher 420 ES Shift Kit is currently in development. We're engineering a precision fit for the TRX420 platform. Sign up to be notified when it's available.
- Fits 2007–2019 Rancher 420
- TRX420FE and TRX420TE trims
- Plug-and-play wiring harness
- 30-minute installation
- Free shipping on US orders
Not sure which model you have? Check the VIN sticker on your frame or contact us and we'll confirm before you order.
All US orders
In-stock orders
Full replacement
No special tools
Not sure which kit is right for your ATV?
Compare HESSK vs. DIY relay vs. ECU bypass — side by side.
Check This Before You Buy Anything
If you can hand-shift the transmission through all the gears with the shifter on the lower left of the motor, you've checked battery condition and connections, tested or replaced the up/down shift buttons on the left handlebar switch, and already tried a known-good shift motor — but you still have a flashing shift code — this kit may solve your electric shift headaches.
Great for diagnostics of the Honda E.S.P. computer shift system — it quickly isolates a mechanical problem from an actual electric sensor or computer problem.
The kit runs on sealed waterproof 5-pin relays, the same style you can pick up at any local auto parts store. One relay powers the upshift, the other controls the downshift — if one ever fails years down the road, you're minutes and a few dollars from back on the trail.
It bypasses the angle sensor, speed sensor, shift computer (ECU), forward/reverse sensor and most of the main wire harness — converting your electric shift to manual-style control without computers or sensors, while you keep shifting with the stock thumb buttons.
Rancher 350 ES Shift Codes (2003–2006)
On 2003–2006 Rancher 350 ES models, the shift system blinks a problem code with the “N” on the gear position indicator when it faults. Per the Honda service manual, 2000–2002 Rancher 350 ES models do not have this code readout. Count the flashes:
| Flashes | System | Check first |
|---|---|---|
| 1 | ECU writing / recording circuit | ECU |
| 2 | Shift switch system (up/down) | Left handlebar shift buttons, wiring, or ECU |
| 3 | Angle sensor system | Angle sensor (or incorrectly installed), wiring, or ECU |
| 4 | Gear position switch system | Gear position switch, wiring, or ECU |
| 5 | ECU motor driver circuit | ECU, or the wiring to the shift motor |
| 6 | ECU fail-safe relay circuit | ECU |
| 7 | ECU voltage conversion circuit | ECU |
| 8 | Angle sensor system | Angle sensor, shift motor, wiring, or ECU |
| 9 | Angle sensor system (short or open) | Angle sensor, wiring, or ECU |
| 10 | Ignition pulse generator system | Pulse generator or wiring |
| 11 | Vehicle speed sensor system | Speed sensor, wiring, or ECU |
| 12 | Gear position switch system | Gear position switch, wiring, or ECU |
Rancher 350 (2003–2006): How to Read, Erase and Reset Codes
From the Honda TRX350TE/FE service manual. Erasing the stored codes clears the ECM (shift computer) memory.
- Check battery voltage first (Honda lists 12.4V minimum) and check for blown fuses.
- Turn the ignition switch OFF.
- Put the transmission in neutral.
- Apply the parking brake so the ATV does not move.
- Push and hold both the upshift and downshift buttons.
- While holding both buttons, turn the ignition switch ON.
- Before the letter “N” appears on the gear position indicator (in about 2 seconds), release both buttons, then push them again for more than 3 seconds. The “N” starts blinking the problem code. If you don’t release and re-push within 2 seconds, the code will not appear. Turn the key off and start over.
- To erase the codes (reset the ECM): while the “N” is blinking the code with the transmission in neutral, push both the upshift and downshift buttons.
- Turn the ignition switch OFF.
Rancher 350: How to Count the Flashes
Every blink is a quick flash (about ¼ second). There are no long blinks on this model. Count the quick blinks in each group. That number is the code: 3 blinks is code 3, 12 blinks is code 12. A 1-second pause comes before each code. The latest problem code shows first, then the older one, then a 2-second pause before the pattern repeats.
A code points to a circuit, not a guaranteed bad part. Most of the time it is a wiring problem: a stick pulled a connector loose, or water got into a plug. Check battery voltage (12.4V minimum per the Honda manual), then the connectors and wiring for that circuit, before you buy parts. Turning the key OFF and back ON also resets the ES system, but if the ECM still sees the fault it shuts the electric shift down again and blinks the code. Disconnecting the battery for a while can sometimes reset it too.
See every model in one place: Honda ES Blink Codes: Electric Shift Code List by Model.
The Last Fix Your Rancher Will Ever Need.
Stop replacing parts. Fix it once with the ES Shift Kit — free shipping, 2-year warranty.